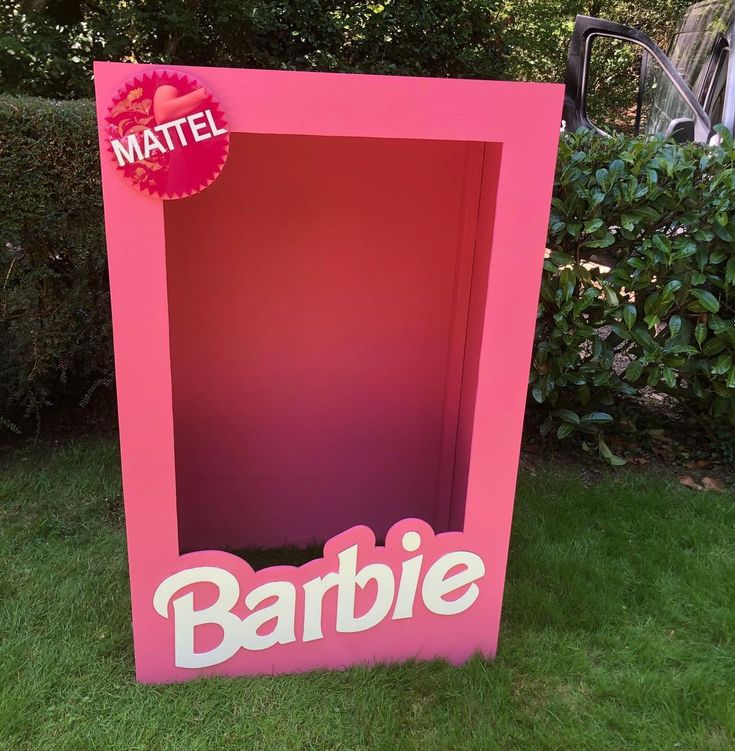
Transforming your event or photo shoot with a life-size Barbie box can make an unforgettable impression. Whether for a birthday party, bridal shower, or promotional event, creating a customized Barbie box is a project that combines creativity, fun, and craftsmanship. Here’s an in-depth guide to designing, building, and styling a standout life-size Barbie box.
Why Create a Life-size Barbie Box?
A life-size Barbie box isn’t just a decorative piece it’s an interactive experience create a life-size Barbie box that offers:
- Immersive Photo Opportunities: Perfect for social media moments.
- Themed Decor Appeal: Complements Barbie-themed parties or promotions.
- Versatile Use: Adaptable for events, marketing campaigns, and personal projects.
Materials You’ll Need
Before starting your project, gather these essentials:
Structural Materials
- Large cardboard sheets or foam boards for the frame.
- Wooden planks or PVC pipes (optional) for added durability.
- Clear acrylic sheet for the front panel to mimic packaging.
Decorative Supplies
- Spray paint or acrylic paint in signature Barbie pink.
- Vinyl decals or stickers for logos and designs.
- Glitter, ribbons, and embellishments for accents.
Assembly Tools
- Glue gun or industrial adhesive.
- Utility knife or box cutter.
- Measuring tape and ruler for precision.
- Clamps to hold pieces while drying.
Step 1: Plan Your Design
Measure Your Dimensions
Choose dimensions that comfortably fit the intended user. For most adults:
- Height: 6-7 feet.
- Width: 3-4 feet.
- Depth: 2-3 feet.
Sketch Your Layout
Include features like:
- A clear front panel.
- The iconic Barbie logo placement.
- Additional branding elements (e.g., themed text or patterns).
Step 2: Build the Frame
Construct the Box
- Cut Panels: Use cardboard or foam boards for the back, sides, and base.
- Join Panels: Secure with a glue gun or adhesive tape, ensuring tight seams.
- Reinforce Edges: Add wooden strips or PVC pipes for strength if necessary.
Install the Front Panel
- Cut an opening on the front for the acrylic sheet.
- Attach the sheet using glue or brackets, ensuring it’s clear and polished. more
Step 3: Paint and Decorate
Painting
- Apply a primer if using cardboard for an even surface.
- Spray or brush on Barbie’s signature pink. Let it dry completely.
- Add accents like metallic gold or silver for a glamorous touch.
Adding Logos and Graphics
- Use pre-made decals or cut vinyl lettering for the Barbie logo.
- Position the logo prominently at the top or center.
Decorative Touches
- Apply glitter or rhinestones for sparkle.
- Add themed text like “Barbie Dreamhouse” or event-specific phrases.
Step 4: Add Personalization
To make your life-size Barbie box stand out:
- Include a custom backdrop inside the box to match your theme.
- Attach LED lights around the frame for a glowing effect.
- Incorporate props or stands for participants to pose with.
Step 5: Ensure Safety and Stability
Reinforce the Structure
- Test the box for stability, especially if multiple people will use it.
- Add weight to the base to prevent tipping over.
Smooth Edges
- Sand down or cover any sharp edges to avoid injuries.
Step 6: Set Up and Showcase
- Place the Barbie box in a well-lit area for maximum visibility.
- Use a sturdy platform or mat for safety and aesthetic purposes.
- Promote the photo-op with signage or a designated photographer.
Ideas for Customization
- Theme Variations:
- Bridal Barbie Box: Add floral accents and pastel colors.
- Holiday Barbie Box: Incorporate festive patterns and decor.
- Interactive Features:
- QR codes linking to digital albums or websites.
- Built-in speakers playing Barbie-themed music.
Conclusion
Creating a life-size Barbie box is a creative project that guarantees a memorable and engaging experience with custom product packaging. By following these steps, you’ll design a striking and durable display piece that captures attention and delivers fun. Whether for personal use or a large-scale event, your custom Barbie box will be the star of the show.


